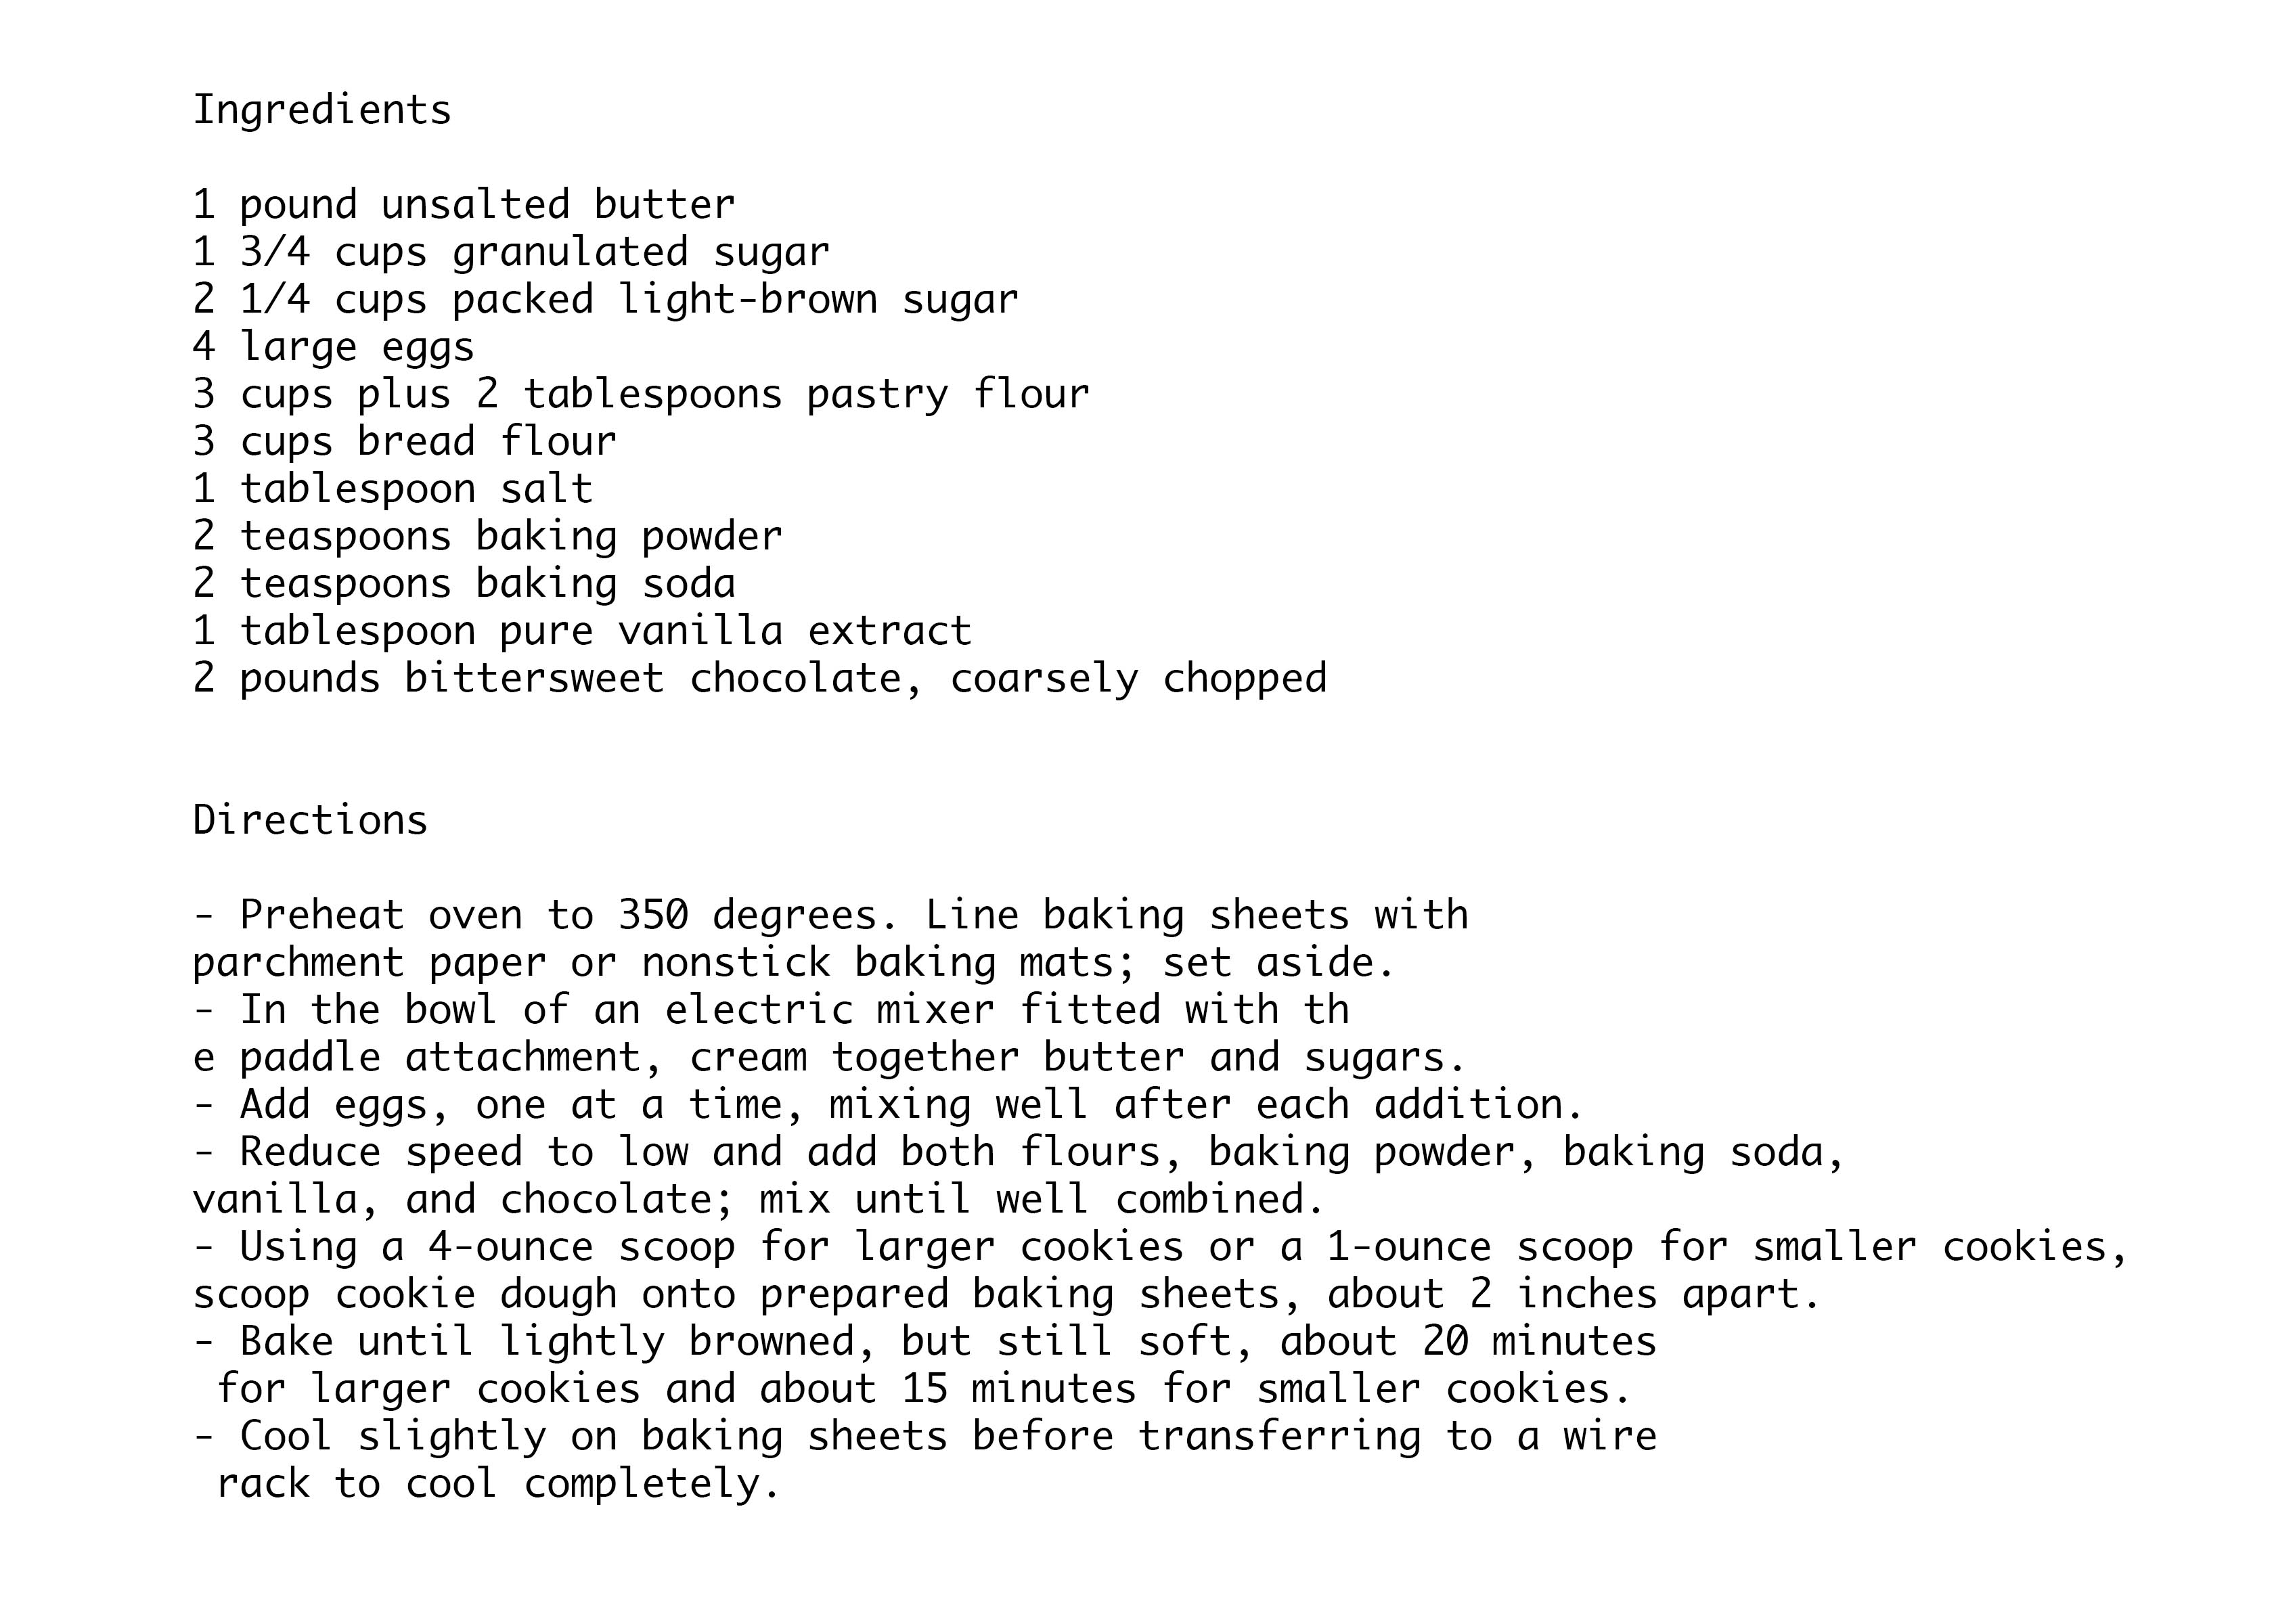
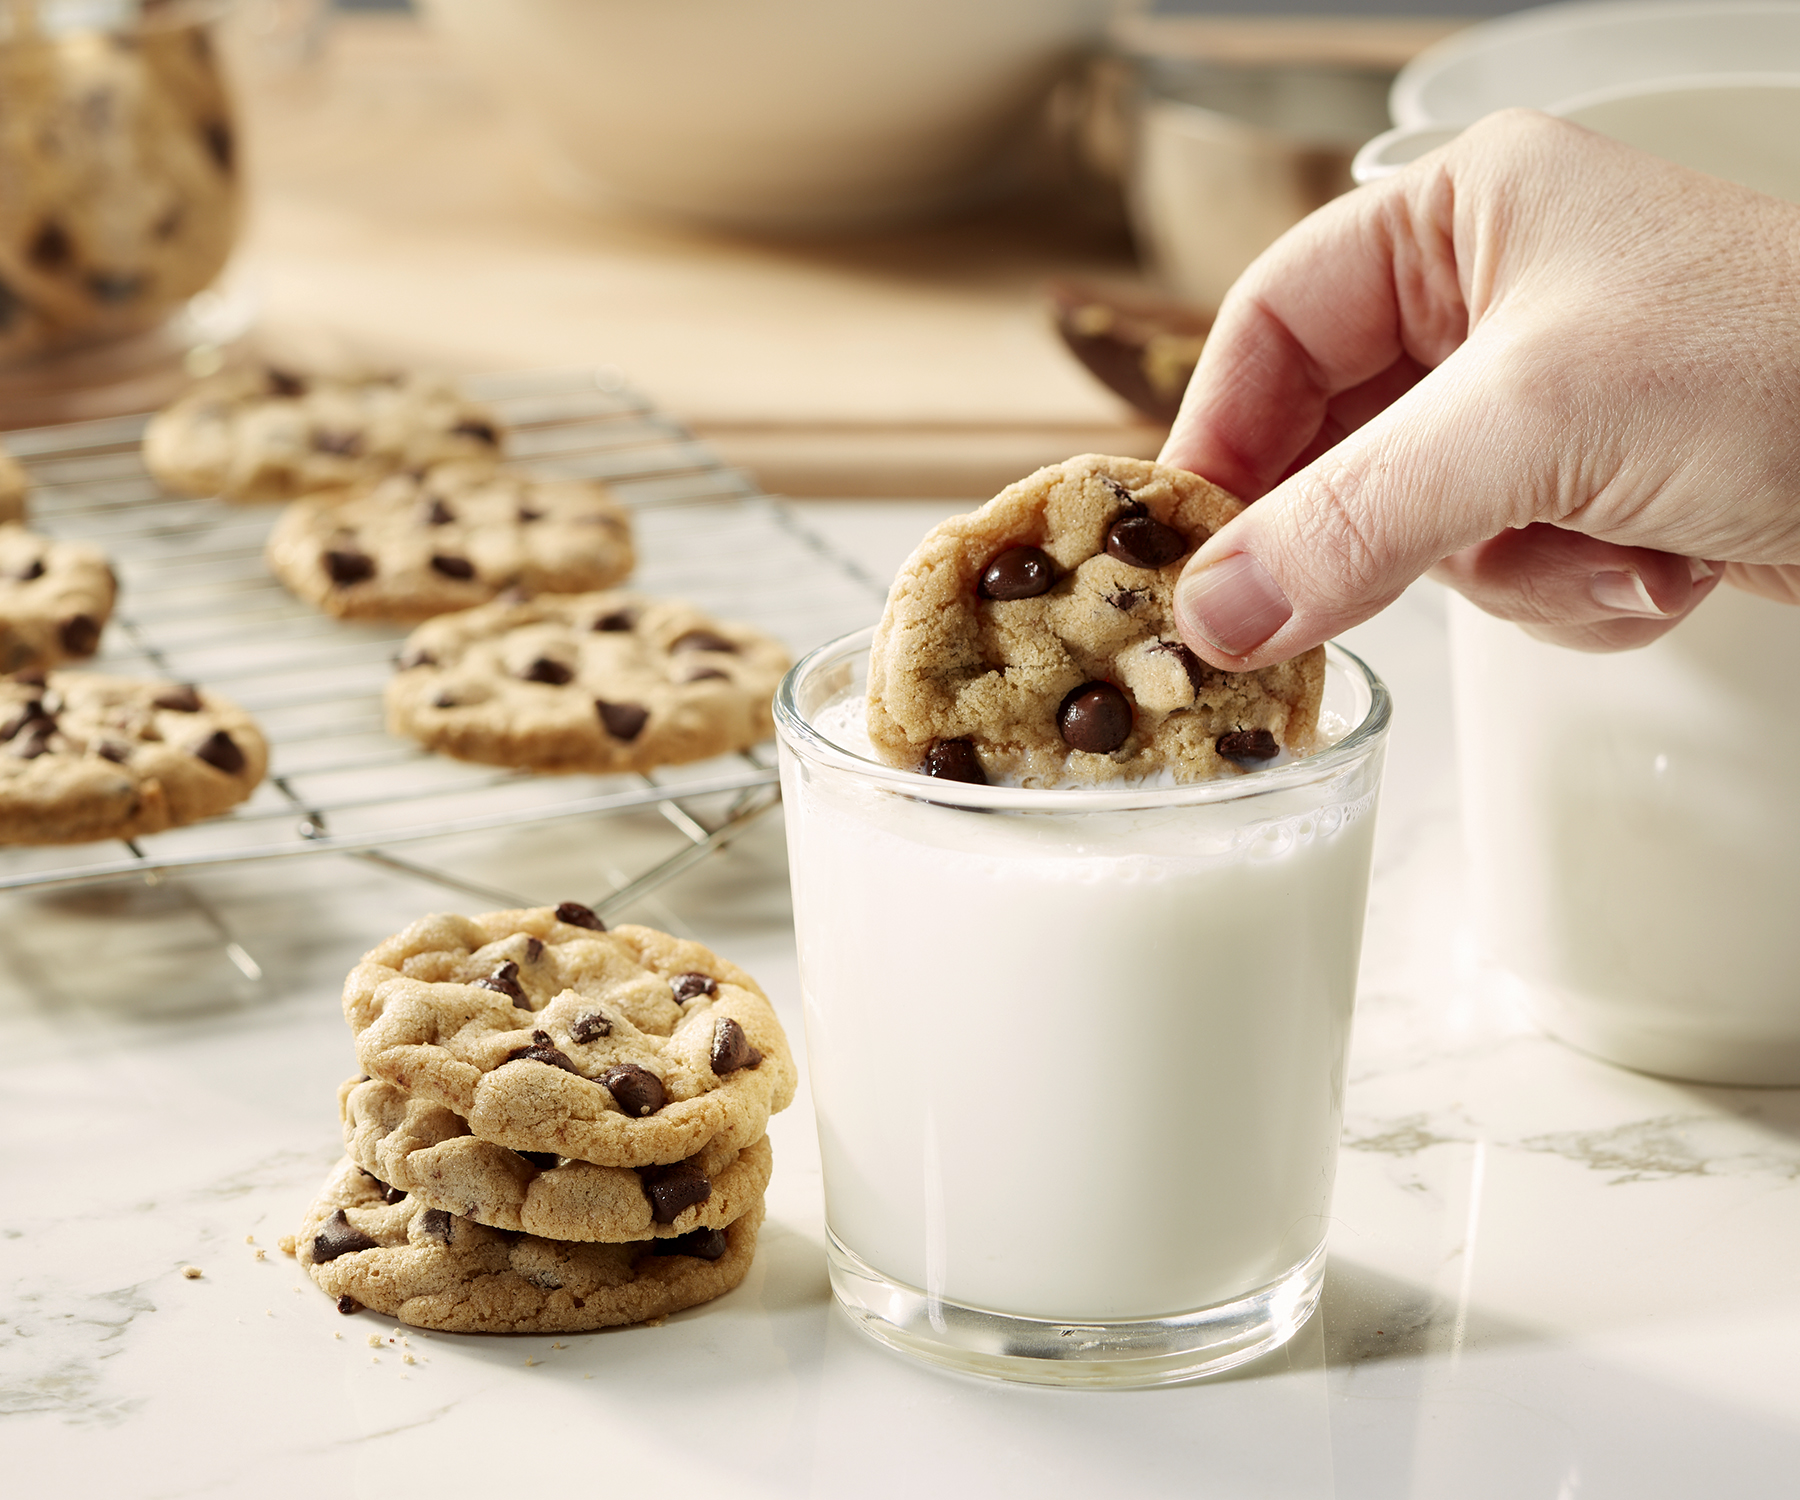
Chocolate Chip Cookies

Ingredients:

MAKES 16

1½cups (200 g) all-purpose flour (spooning into measuring cups, then leveling)

1¼tsp. (4 g) Diamond Crystal or ¾ tsp. (4 g) Morton kosher salt

¾tsp. (4 g) baking soda

¾cup (1½ sticks; 169 g) unsalted butter, divided

1cup (200 g) (packed) dark brown sugar

¼cup (50 g) granulated sugar

1 large egg

2 large egg yolks

2tsp. vanilla extract

6oz. (170 g) bittersweet chocolate or semisweet chocolate chips

Preparation:

Step 1

Place racks in upper and lower thirds of oven; preheat to 375°. Whisk flour, salt, and baking soda in a small bowl; set aside.

Step 2

Cook ½ cup (1 stick; 113 g) butter in a large saucepan over medium heat, swirling often and scraping bottom of pan with a heatproof rubber spatula, until butter foams, then browns, about 4 minutes. Transfer butter to a large heatproof bowl and let cool 1 minute. Cut remaining ¼ cup (½ stick; 56 g) butter into small pieces and add to brown butter (it should start to melt but not foam and sizzle, so test with one piece before adding the rest).

Step 3

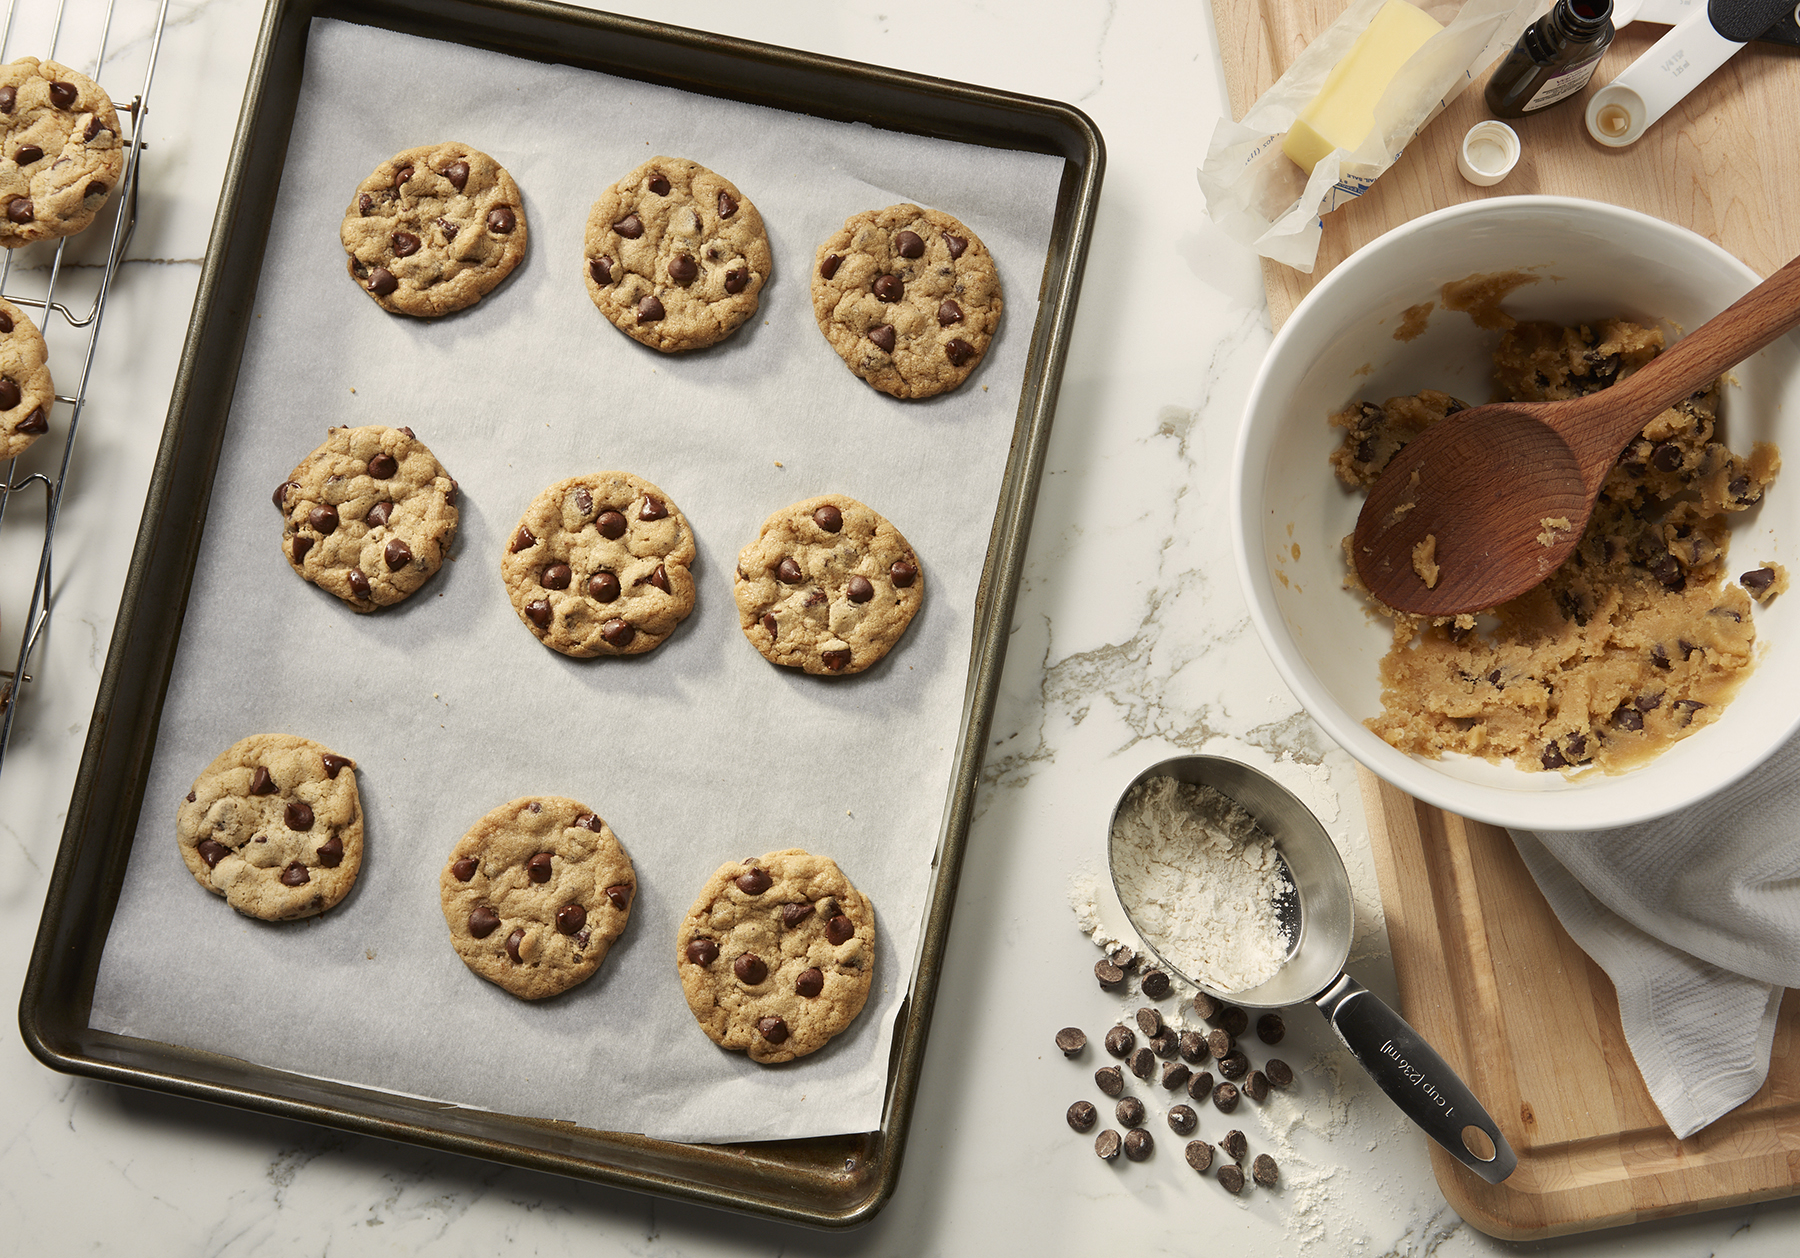
Once butter is melted, add both sugars and whisk, breaking up any clumps, until sugar is incorporated and no lumps remain. Add egg and egg yolks and whisk until sugar dissolves and mixture is smooth, about 30 seconds. Whisk in vanilla. Using rubber spatula, fold reserved dry ingredients into butter mixture just until no dry spots remain, then fold in chocolate (the dough will be soft but should hold its shape once scooped; if it slumps or oozes after being scooped, stir dough back together several times and let rest 5–10 minutes until scoops hold their shape as the flour hydrates).

Step 4

Using a 1½-oz. scoop (3 Tbsp.), portion out 16 balls of dough and divide between 2 parchment-lined rimmed baking sheets. Bake cookies, rotating sheets if cookies are browning very unevenly (otherwise, just leave them alone), until deep golden brown and firm around the edges, 8–10 minutes. Let cool on baking sheets.

Step 5

Do Ahead: Cookies can be made 3 days ahead. Store airtight at room temperature.

RECIPE from bon appetit

Chewy OatMeal Raisin Cookies

oatmealcookiebite copy_MG_9517 copy
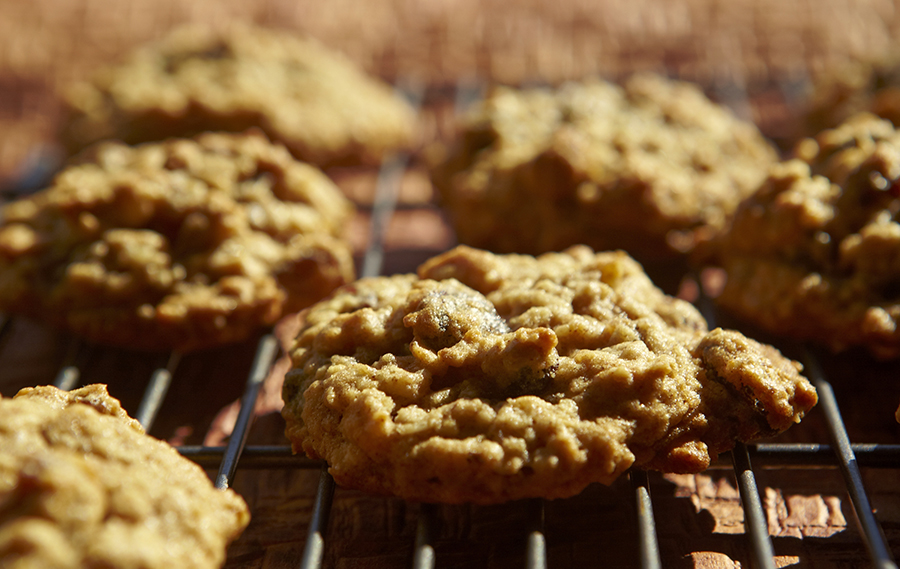
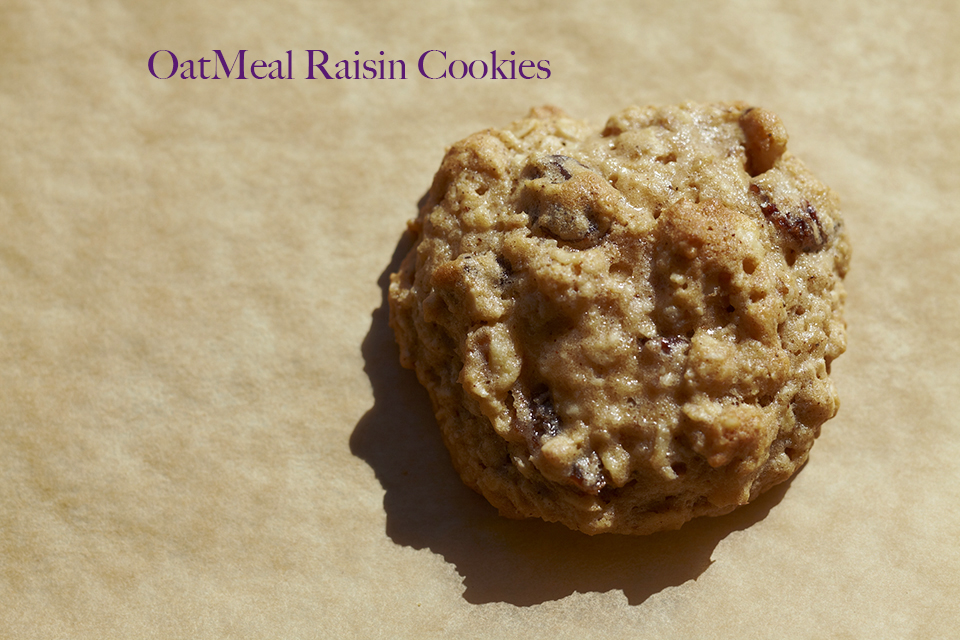
I’m still in the baking mode, with a fall inspired theme.  This recipe I found on smitten kitchen and decided to give it a try. I am usually looking for a soft chewy cookie and this cookie delivers.  As I was doing some research I found there are several tricks to get a thick chewy cookie. One simple technique is to refrigerate the dough before baking. This recipe instructions is to place the cookie dough balls on the cookie sheets and then chilling it in the refrigerator before baking.  This will be a must do when ever baking cookies in the future. the Oatmeal Raisin cookies have a slight flavor of cinnamon and not too sweet, I could even pretend it’s  a healthy breakfast oat treat.

Happy Baking_MG_9520reciperecipe from Smitten Kitchen

Christmas Rosette Cookies

titleThe holidays are mostly about nostalgia and family traditions for me.  Those favorite treats that come out on the buffet table and you try to wait till after dinner before you eat them all.  My grandparent’s house is the root of most of my childhood holiday memories. Gathering in the basement and my grandpa playing christmas records, the kids gathered around with the song books in hand. Whomever sang the best got to open up a gift, it was very competitive. Grandma was a good cook and had lots of christmas treats to choose from, one that always made it on the table was the Rosette cookies.

“A rosette called struva in Swedish is a thin, cookie-like deep-fried pastry of Scandinavian (Swedish and Norwegian) origin. Rosettes are traditionally made during Christmas time. They are made using intricately designed irons. The iron is heated to a very high temperature in oil, dipped into the batter, then re-immersed in the hot oil to create a crisp shell around the metal. The iron is immediately removed and the rosette is separated from the iron. Usually, the edges of the rosette are dipped into frosting or sugar. Rosette recipes are popular in the United States among families with Scandinavian ancestry.”

So when my mother in law asked if I wanted to help her make some Rosette cookies I was very excited, I had never actually seen anyone make them before.  The tricky part was getting the oil to the correct temperature and getting the batter to the correct crispy pastry texture,  and not eating them all as they came off the iron all warm and crunchy.

window_MG_0331M0319_MG_0333_MG_0332RECIPE

Ingredients:

  • 2 eggs
  • 1 tablespoon sugar
  • 1/4 teaspoon salt
  • 1 cup flour
  • 1 cup whole milk
  • 1 teaspoon vanilla
  • peanut oil for deep frying
  • 1 cup sugar
  • 2 teaspoons cinnamon

Preparation:

Beat eggs slightly. Add 1 tablespoon sugar and salt. Add flour and milk alternately, blending until smooth. Stir in vanilla. The batter should be about as thick as pancake batter. If it isn’t, add more flour, a tablespoon at a time. If it is too thick, add a teaspoon of milk at a time.Heat 3″ of oil in a deep fryer to 365 degrees. (A deep frying thermometer is very helpful, and I highly recommend it.) Place a rosette iron in the hot oil for 60 seconds. There’s no way to take the temperature of the iron; it just has to be hot.

Dip the hot iron into the batter, making sure NOT to let the batter run over the top of the iron. If you do, the rosette will be impossible to remove. Immerse the coated iron in the hot fat and fry 25-30 seconds until light brown. Slip off onto a paper towel.

On large plate, combine 1 cup sugar and cinnamon and mix well. Dip rosettes in this mixture while still warm. You can also sprinkle them with powdered sugar. Don’t skip this step – the cookies aren’t really sweetened until they’re coated in some kind of sugar! Makes about 36 rosettes…….from Busy Cooks


Have a fabulous holiday and happy baking.

Chocolate Rum Balls

I’ve been thinking about Rum Balls all year, after trying my first Rum Ball at a holiday party last winter. They were bakery bought Rum Balls and I wanted to keep popping those rum balls into my mouth. I made my first batch this season. There are lots of recipes to choose from but I was looking for the most chocolate and rum I could get. I tried this recipe, it’s like baking brownies. As opposed to most recipes that call for wafer cookies. Those did not seem like it would give the richness I am after. Next time I would like to try some of the 90 proof rum I saw at the store. And instead of rolling them in crystal sugar, which was just to sweet and crunchy, try some chocolate shavings.  I have to say the search is still on for a better recipe. Perhaps more of a truffle approach cuz there is still one more batch to make for the holiday party. The quest for rum balls continues.

second attempt at making this recipe, I baked the brownie mixture a little longer to dry it out more in an attempt to add more rum.  This seemed to help, and them added a few more tablespoons rum, which did make it a bit more gooey.  So I took what i had on hand and mixed in another 1/2 cup of Ghirardelli hot chocolate mix. I also used the ghirardelli hot chocolate mix to roll the rum balls in-this was a big improvement on the last batch of rum balls.

Ingredients

  • Vegetable oil, cooking spray
  • 3/4 cup (1 1/2 sticks) unsalted butter, cut into pieces
  • 6 ounces semisweet chocolate, finely chopped
  • 3 large eggs
  • 1/2 cup packed light-brown sugar
  • 1 teaspoon pure vanilla extract
  • 1/2 teaspoon coarse salt
  • 3/4 cup all-purpose flour
  • 1/4 cup plus 2 tablespoons dark rum
  • Coarse sanding sugar, for rolling

Directions

  1. Preheat oven to 350. Coat a 12-by-17-inch rimmed baking sheet with cooking spray; set aside. Melt butter and chocolate in a small heatproof bowl set over a pan of simmering water, stirring occasionally. Set aside.
  2. Whisk together eggs, brown sugar, vanilla, and salt in a large bowl. Stir in chocolate mixture, then fold in flour. Pour batter into prepared baking sheet. Spread evenly with a rubber spatula. Bake until top is shiny and a cake tester inserted into center comes out with some crumbs attached, about 10 minutes. Let cool completely on a wire rack.
  3. Break up brownie into small pieces; transfer to the bowl of an electric mixer fitted with the paddle attachment. With machine on low speed, pour in rum, and mix until crumbs start to come together to form a ball.
  4. Shape into 1-inch balls, and roll in sanding sugar to coat. Transfer to a baking sheet; refrigerate, uncovered, until cold, about 2 hours. Serve chilled or at room temperature.

RECIPE: Martha Stewart living


Pumpkin Whoopie Pies

Whoopie Pies are soft cake like cookies with frosting filling sandwiched between the cookies. As you can tell the holidays gets me in the mood to bake and share with friends. So I’m not the only one slacking on the diet, no one likes to snack alone.  These cookies are very rich it is not just a cookie, it’s dessert. A good alternative to a pumpkin pie. Next time I will make them smaller more bite size portions. They should be stored in the refrigerator and best to eat and not let sit around too long. There are many versions of Whoopie Pies, I will need to explore more combinations. Perhaps a brownie with peanut butter filling…mmmm

Ingredients

  • For the Cream-Cheese Filling

    • 3 cups confectioners’ sugar
    • 1/2 cup (1 stick) unsalted butter, softened
    • 8 ounces cream cheese, softened
    • 1 teaspoon pure vanilla extract
  • For the Pumpkin Whoopie Cookies

    • 3 cups all-purpose flour
    • 1 teaspoon salt
    • 1 teaspoon baking powder
    • 1 teaspoon baking soda
    • 2 tablespoons ground cinnamon
    • 1 tablespoon ground ginger
    • 1 tablespoon ground cloves
    • 2 cups firmly packed dark-brown sugar
    • 1 cup vegetable oil
    • 3 cups pumpkin puree, chilled
    • 2 large eggs
    • 1 teaspoon pure vanilla extract

Directions

  1. Make the cookies: Preheat oven to 350 degrees. Line two baking sheets with parchment paper or a nonstick baking mat; set aside.
  2. In a large bowl, whisk together flour, salt, baking powder, baking soda, cinnamon, ginger, and cloves; set aside. In another large bowl, whisk together brown sugar and oil until well combined. Add pumpkin puree and whisk until combined. Add eggs and vanilla and whisk until well combined. Sprinkle flour mixture over pumpkin mixture and whisk until fully incorporated.
  3. Using a small ice cream scoop with a release mechanism, drop heaping tablespoons of dough onto prepared baking sheets, about 1 inch apart. Transfer to oven and bake until cookies are just starting to crack on top and a toothpick inserted into the center of each cookie comes out clean, about 15 minutes. Let cool completely on pan.
  4. Make the filling: Sift confectioner’ sugar into a medium bowl; set aside. In the bowl of an electric mixer fitted with the paddle attachment, beat butter until smooth. Add cream cheese and beat until well combined. Add confectioners’ sugar and vanilla, beat just until smooth. (Filling can be made up to a day in advance. Cover and refrigerate; let stand at room temperature to soften before using.)
  5. Assemble the whoopie pies: Line a baking sheet with parchment paper and set aside. Transfer filling to a zip lock bag and snip the end. When cookies have cooled completely, pipe a large dollop of filling on the flat side of half of the cookies. Sandwich with remaining cookies, pressing down slightly so that the filling spreads to the edge of the cookies. Transfer to prepared baking sheet and cover with plastic wrap. Refrigerate cookies at least 30 minutes before serving and up to 3 days.
RECIPE: Martha Stewart Living

Over Thanksgiving break we went to Chicago for a night and explored the Modern wing of The Art Institute. Great way to spend the rainy afternoon.